 Muhammad Zhafran Ilham
5e77286fcc
Muhammad Zhafran Ilham
5e77286fcc
feat(project): menambahkan perhitungan task_done sebuah project untuk intern & admin
Internify API Documentation

Backend API untuk Website Penerimaan Magang HUMIC Engineering - Dibangun dengan Express.js, Prisma ORM, dan MySQL.
📑 Table of Contents
- Introduction
- Quick Start
- Project Structure
- Architecture
- Development Guide
- API Documentation
- Testing
- Deployment
- Contributing
- Troubleshooting
Introduction
Project intern HUMIC Batch 4 & 5 - Website Penerimaan Magang
Framework: Express.js
ORM: Prisma
Database: MySQL
Authentication: JWT (RS256)
👥 Development Team
Team Humic Intern Batch 4
| Nama | Role |
|---|---|
| REINHARD EFRAIM SITUMEANG | UI/UX WEBSITE |
| SHAFA SALMA PERMANA | UI/UX MOBILE |
| MUHAMMAD FARIED GUNAWAN | FRONT END DEVELOPER |
| YOHANES JANUARICO ANDIAWAN | BACK END DEVELOPER |
| REIHAN RAMADHANA ANWARI | BACK END DEVELOPER |
| DELKANO MARZUKI BERUTU | MOBILE DEVELOPER |
Team Humic Intern Batch 5
| Nama | Role |
|---|---|
| BILLY MARCELO | FRONTEND DEVELOPER |
| MAHESA BAGUS RADITYA | BACK END DEVELOPER |
| SASI AFRILIA | UI/UX WEBSITE |
Team Humic Intern Batch 6
| Nama | Role |
|---|---|
| MUHAMMAD RAFI ATHALLAH | BACK END DEVELOPER |
| MUHAMMAD ZHAFRAN ILHAM | BACK END DEVELOPER |
| KEMAS M. ARYADARY RASYAD | FRONT END DEVELOPER |
| ANOM AYU RADHASWASTI | UI/UX WEBSITE |
🗄️ Database Structure
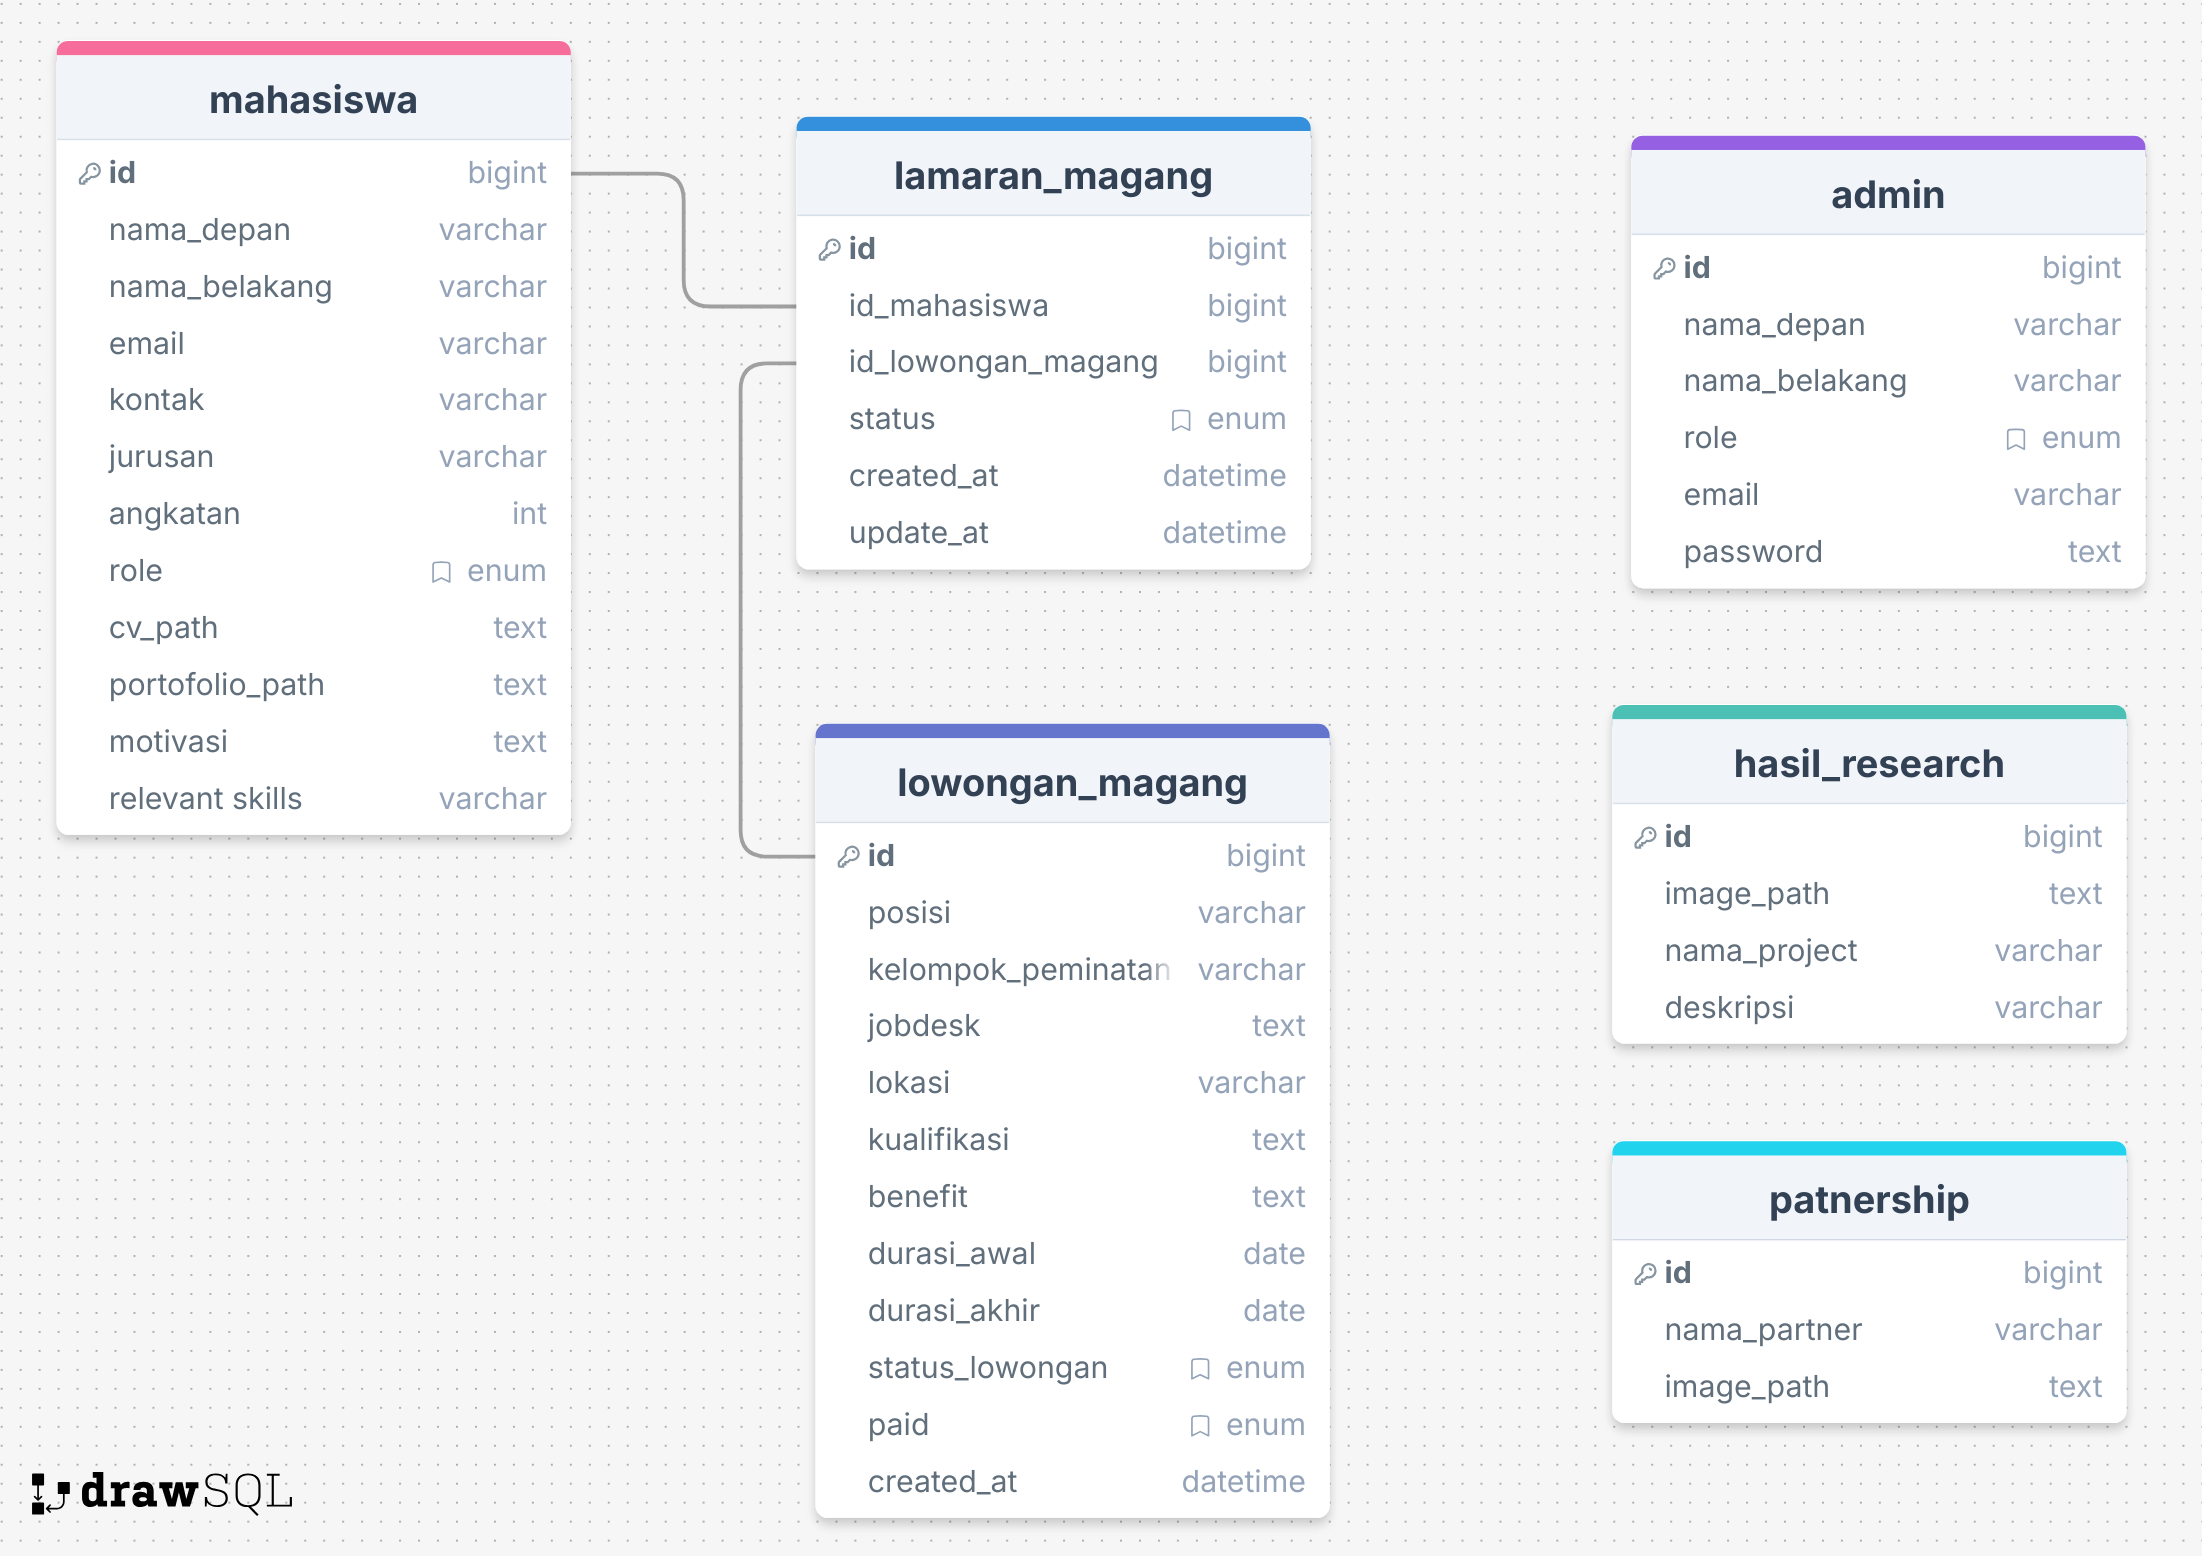 The database consists of the following tables:
- mahasiswa: Menyimpan data lengkap mahasiswa yang mendaftar magang.
- admin: Digunakan untuk login dan mengelola lowongan.
- lowongan_magang: Informasi detail tentang posisi magang yang tersedia.
- lamaran_magang: Data lamaran yang diajukan mahasiswa.
- hasil_research: Menyimpan hasil riset proyek dari mahasiswa atau tim.
- partnership: Data partner/institusi yang bekerja sama.
- faq: Data pertanyaan dan jawaban yang sering ditanyakan (Frequently Asked Questions).
🚀 Quick Start
Prerequisites
Pastikan Anda sudah menginstall:
- Node.js (v16 atau lebih tinggi)
- npm atau yarn
- MySQL (v8 atau lebih tinggi)
- Git
Installation
1. Clone Repository
git clone https://github.com/Ditrogen/backend-intern-humic.git
cd backend-intern-humic
2. Install Dependencies
npm install
Environment Setup
3. Buat File .env
Salin file .env.example menjadi .env:
cp .env.example .env
4. Konfigurasi Environment Variables
Edit file .env dan isi dengan konfigurasi Anda:
# Database Configuration
DATABASE_URL="mysql://username:password@localhost:3306/internify_db"

# Server Configuration
PORT=9000

# Email Configuration (untuk notifikasi)
AUTH_EMAIL='your-email@gmail.com'
AUTH_PASSWORD='your-app-specific-password'

# JWT Configuration
JWT_PRIVATE_KEY=-----BEGIN RSA PRIVATE KEY-----\nYOUR_PRIVATE_KEY\n-----END RSA PRIVATE KEY-----
JWT_PUBLIC_KEY=-----BEGIN PUBLIC KEY-----\nYOUR_PUBLIC_KEY\n-----END PUBLIC KEY-----

# ReCaptcha Configuration
RECAPTCHA_SECRET_KEY=your-recaptcha-secret-key
RECAPTCHA_SITE_KEY=your-recaptcha-site-key
💡 Tips: Untuk generate RSA key pair, gunakan OpenSSL:
# Generate private key
openssl genrsa -out private.pem 2048
# Generate public key
openssl rsa -in private.pem -pubout -out public.pem
Database Setup
5. Buat Database MySQL
mysql -u root -p
CREATE DATABASE internify_db;
EXIT;
6. Generate Prisma Client
npx prisma generate
7. Run Database Migration
npx prisma migrate dev
Ini akan membuat semua tabel yang diperlukan berdasarkan schema Prisma.
8. (Optional) Seed Database
Jika ada data seeder:
npx prisma db seed
Running the Server
Development Mode
npm run dev
Server akan berjalan di http://localhost:9000
Production Mode
npm start
⚠️ Perhatian:
- Gunakan
npm run devuntuk development- Gunakan
npm startuntuk production
Testing the API
Setelah server berjalan, buka Swagger UI untuk testing:
http://localhost:9000/api-docs
📝 Note: Swagger hanya tersedia jika
NODE_ENVbukanproductiondanSWAGGER_ENABLEDbernilaitrue
📚 Project Structure
backend-intern-humic/
├── prisma/
│   ├── schema.prisma              # Prisma schema definition
│   ├── prisma.config.js           # Prisma configuration
│   └── migrations/                # Database migrations
├── src/
│   ├── index.js                   # Main application entry point
│   ├── docs/
│   │   ├── swagger.js             # Swagger/OpenAPI configuration
│   │   └── ERD.png                # Entity Relationship Diagram
│   ├── helpers/
│   │   ├── db/                    # Database connection (Prisma client)
│   │   ├── error/                 # Custom error classes
│   │   ├── http-status/           # HTTP status codes
│   │   ├── infra/                 # Infrastructure config
│   │   └── utils/                 # Utility functions
│   │       ├── validator.js       # Joi validation helpers
│   │       ├── wrapper.js         # Response wrapper functions
│   │       └── fileHelper.js      # File handling utilities
│   ├── middleware/
│   │   ├── multer.js              # File upload configuration
│   │   ├── recaptcha.js           # ReCaptcha verification
│   │   └── verifyJWT.js           # JWT authentication
│   ├── modules/                   # Feature modules (MVC pattern)
│   │   ├── admin/
│   │   │   ├── controllers/       # Handle HTTP requests
│   │   │   ├── services/          # Business logic
│   │   │   ├── repositories/      # Database operations
│   │   │   ├── models/            # Joi validation schemas
│   │   │   └── index.js           # Module exports
│   │   ├── auth/
│   │   ├── batch/
│   │   ├── faq/
│   │   ├── feedback/
│   │   ├── hasilResearch/
│   │   ├── lamaranMagang/
│   │   ├── lowonganMagang/
│   │   ├── mahasiswa/
│   │   └── partnership/
│   ├── routes/                    # API route definitions
│   │   ├── admin.routes.js
│   │   ├── auth.routes.js
│   │   ├── ...
│   └── uploads/                   # File upload directory (development)
├── .env                           # Environment variables (not committed)
├── .env.example                   # Environment variables template
├── package.json                   # Node.js dependencies and scripts
├── vercel.json                    # Vercel deployment configuration
└── README.md                      # This file
Folder Explanation
| Folder/File | Purpose |
|---|---|
prisma/ |
Prisma ORM schema, config, dan migrations |
src/index.js |
Entry point Express application |
src/helpers/ |
Utility functions, error classes, DB connection |
src/middleware/ |
Express middleware (auth, upload, validation) |
src/modules/ |
Feature modules following 4-layer architecture |
src/routes/ |
API endpoint definitions |
.env |
Environment variables (credentials, config) |
vercel.json |
Serverless deployment configuration |
🏛️ Architecture
Technology Stack
| Technology | Version | Purpose |
|---|---|---|
| Node.js | v16+ | Runtime environment |
| Express.js | 4.x | Web framework |
| Prisma | 6.16.2 | ORM (Object-Relational Mapping) |
| MySQL | 8.x | Relational database |
| JWT | - | Authentication (RS256 signature) |
| Joi | - | Schema validation |
| Multer | - | File upload handling |
| Nodemailer | - | Email service |
| Swagger | - | API documentation |
| Vercel | - | Serverless deployment |
Module Architecture (4-Layer Pattern)
Setiap module di folder src/modules/ mengikuti arsitektur 4 layer untuk separation of concerns:
module/
├── controllers/     → Layer 1: Menangani HTTP request/response
├── services/        → Layer 2: Business logic dan pemrosesan data
├── repositories/    → Layer 3: Operasi database (Prisma queries)
├── models/          → Layer 4: Validasi input (Joi schemas)
└── index.js         → Module exports
Layer Responsibilities
1. Controllers (controllers/)
- Menerima HTTP request dari route
- Validasi input menggunakan Joi models
- Memanggil service layer
- Mengembalikan HTTP response dengan wrapper
- Error handling
2. Services (services/)
- Business logic utama
- Validasi business rules
- Memanggil repository untuk database operations
- Data transformation
- Orchestration antar repositories
3. Repositories (repositories/)
- Database operations (CRUD) menggunakan Prisma
- Query construction
- Data mapping
- Tidak ada business logic
4. Models (models/)
- Joi schema definitions
- Input validation rules
- Error messages (Indonesian)
Request Flow
graph LR
    A[Client] -->|HTTP Request| B[Route]
    B --> C[Controller]
    C -->|Validate| D[Joi Model]
    D -->|Valid| E[Service]
    E -->|Business Logic| E
    E --> F[Repository]
    F -->|Prisma Query| G[MySQL Database]
    G -->|Data| F
    F --> E
    E --> C
    C -->|Wrapper| H[HTTP Response]
    H --> A
Step-by-step:
- Client mengirim HTTP request
- Route menerima request dan memanggil controller
- Controller validasi input menggunakan Joi Model
- Controller memanggil Service
- Service memproses business logic
- Service memanggil Repository
- Repository query database menggunakan Prisma
- Database mengembalikan data ke Repository
- Repository mengembalikan data ke Service
- Service mengembalikan data ke Controller
- Controller mengirim response dengan wrapper
- Client menerima HTTP response
Key Features
✅ JWT Authentication (RS256) - RSA signature-based tokens dengan token expiry 1 day
✅ Joi Validation - Schema validation untuk semua input dengan pesan error dalam Bahasa Indonesia
✅ File Upload Management - Automatic file cleanup on errors, support multiple file types
✅ Automatic Status Updates - Lowongan magang status auto-update berdasarkan tanggal
✅ CORS Configuration - Configurable CORS untuk cross-origin requests
✅ Centralized Error Handling - Custom error classes dengan pesan konsisten
✅ Response Wrapper - Standardized API response format
✅ Swagger Documentation - Interactive API documentation dengan Swagger UI
🛠️ Development Guide
Creating a New Module
Ikuti langkah-langkah berikut untuk membuat module baru:
Cara Membuat Module (Langkah demi Langkah)
Langkah 1: Buat Struktur Module
modules/
  yourModule/
    ├── index.js                 # Export semua komponen
    ├── controllers/
    │   └── yourModule.controller.js
    ├── services/
    │   └── yourModule.service.js
    ├── repositories/
    │   └── yourModule.repository.js
    └── models/
        └── yourModule.model.js
Langkah 2: Buat Validation Model (models/)
File: models/yourModule.model.js
const joi = require("joi");

// Validasi untuk membuat record baru
const createYourModuleModel = joi.object({
  name: joi.string().required().messages({
    "string.base": "Nama harus berupa teks.",
    "any.required": "Nama wajib diisi.",
  }),
  email: joi.string().email().required().messages({
    "string.email": "Format email tidak valid.",
    "any.required": "Email wajib diisi.",
  }),
  age: joi.number().min(18).messages({
    "number.base": "Umur harus berupa angka.",
    "number.min": "Umur minimal 18 tahun.",
  }),
});

// Validasi untuk update record
const updateYourModuleModel = joi.object({
  name: joi.string().messages({
    "string.base": "Nama harus berupa teks.",
  }),
  email: joi.string().email().messages({
    "string.email": "Format email tidak valid.",
  }),
  age: joi.number().min(18).messages({
    "number.base": "Umur harus berupa angka.",
    "number.min": "Umur minimal 18 tahun.",
  }),
});

module.exports = {
  createYourModuleModel,
  updateYourModuleModel,
};
Langkah 3: Buat Repository (repositories/)
File: repositories/yourModule.repository.js
const prisma = require("../../../helpers/db/db_connection");

class YourModuleRepository {
  // Buat record baru
  async create(data) {
    return prisma.yourModel.create({
      data: data,
    });
  }

  // Ambil semua record
  async findAll() {
    return prisma.yourModel.findMany();
  }

  // Ambil berdasarkan ID
  async findById(id) {
    return prisma.yourModel.findUnique({
      where: { id: parseInt(id) },
    });
  }

  // Update berdasarkan ID
  async updateById(id, data) {
    return prisma.yourModel.update({
      where: { id: parseInt(id) },
      data: data,
    });
  }

  // Hapus berdasarkan ID
  async deleteById(id) {
    return prisma.yourModel.delete({
      where: { id: parseInt(id) },
    });
  }
}

module.exports = new YourModuleRepository();
Langkah 4: Buat Service (services/)
File: services/yourModule.service.js
const yourModuleRepository = require("../repositories/yourModule.repository");
const { data, error } = require("../../../helpers/utils/wrapper");
const { NotFoundError, BadRequestError } = require("../../../helpers/error");

class YourModuleService {
  // Buat record baru
  async createYourModule(moduleData) {
    try {
      // Business logic di sini (contoh: cek duplikat)
      const existing = await yourModuleRepository.findByEmail(moduleData.email);

      if (existing) {
        return error(new BadRequestError("Email Sudah Terdaftar"));
      }

      const result = await yourModuleRepository.create(moduleData);
      return data(result);
    } catch (err) {
      return error(err);
    }
  }

  // Ambil semua record
  async getAllYourModule() {
    try {
      const results = await yourModuleRepository.findAll();
      return data(results);
    } catch (err) {
      return error(err);
    }
  }

  // Ambil berdasarkan ID
  async getYourModuleById(id) {
    try {
      const result = await yourModuleRepository.findById(id);

      if (!result) {
        return error(new NotFoundError("Data Tidak Ditemukan"));
      }

      return data(result);
    } catch (err) {
      return error(err);
    }
  }

  // Update berdasarkan ID
  async updateYourModule(id, moduleData) {
    try {
      // Cek apakah data ada
      const checkResult = await this.getYourModuleById(id);
      if (checkResult.err) {
        return checkResult;
      }

      const result = await yourModuleRepository.updateById(id, moduleData);
      return data(result);
    } catch (err) {
      return error(err);
    }
  }

  // Hapus berdasarkan ID
  async deleteYourModule(id) {
    try {
      // Cek apakah data ada
      const checkResult = await this.getYourModuleById(id);
      if (checkResult.err) {
        return checkResult;
      }

      const result = await yourModuleRepository.deleteById(id);
      return data(result);
    } catch (err) {
      return error(err);
    }
  }
}

module.exports = new YourModuleService();
Langkah 5: Buat Controller (controllers/)
File: controllers/yourModule.controller.js
const yourModuleService = require("../services/yourModule.service");
const {
  createYourModuleModel,
  updateYourModuleModel,
} = require("../models/yourModule.model");
const { response } = require("../../../helpers/utils/wrapper");
const { isValidPayload } = require("../../../helpers/utils/validator");
const { InternalServerError } = require("../../../helpers/error");
const { SUCCESS, ERROR } = require("../../../helpers/http-status/status_code");

class YourModuleController {
  // CREATE - POST /your-module-api/add
  async addYourModule(req, res) {
    try {
      const payload = req.body;

      // Validasi input
      const validatePayload = isValidPayload(payload, createYourModuleModel);

      if (validatePayload.err) {
        return response(
          res,
          "fail",
          validatePayload,
          "Validasi gagal",
          ERROR.EXPECTATION_FAILED,
        );
      }

      // Panggil service
      const result = await yourModuleService.createYourModule(
        validatePayload.data,
      );

      if (result.err) {
        return response(res, "fail", result);
      }

      return response(
        res,
        "success",
        result,
        "Data berhasil ditambahkan",
        SUCCESS.CREATED,
      );
    } catch (err) {
      return response(
        res,
        "fail",
        { err: new InternalServerError(err.message) },
        "Terjadi kesalahan yang tidak terduga",
        ERROR.INTERNAL_ERROR,
      );
    }
  }

  // READ ALL - GET /your-module-api/get
  async getAllYourModule(req, res) {
    try {
      const result = await yourModuleService.getAllYourModule();

      if (result.err) {
        return response(res, "fail", result);
      }

      return response(
        res,
        "success",
        result,
        "Data berhasil diambil",
        SUCCESS.OK,
      );
    } catch (err) {
      return response(
        res,
        "fail",
        { err: new InternalServerError(err.message) },
        "Terjadi kesalahan yang tidak terduga",
        ERROR.INTERNAL_ERROR,
      );
    }
  }

  // READ ONE - GET /your-module-api/get/:id
  async getYourModuleById(req, res) {
    try {
      const { id } = req.params;

      const result = await yourModuleService.getYourModuleById(id);

      if (result.err) {
        return response(res, "fail", result);
      }

      return response(
        res,
        "success",
        result,
        "Data berhasil diambil",
        SUCCESS.OK,
      );
    } catch (err) {
      return response(
        res,
        "fail",
        { err: new InternalServerError(err.message) },
        "Terjadi kesalahan yang tidak terduga",
        ERROR.INTERNAL_ERROR,
      );
    }
  }

  // UPDATE - PATCH /your-module-api/update/:id
  async updateYourModule(req, res) {
    try {
      const { id } = req.params;
      const payload = req.body;

      // Validasi input
      const validatePayload = isValidPayload(payload, updateYourModuleModel);

      if (validatePayload.err) {
        return response(
          res,
          "fail",
          validatePayload,
          "Validasi gagal",
          ERROR.EXPECTATION_FAILED,
        );
      }

      // Panggil service
      const result = await yourModuleService.updateYourModule(
        id,
        validatePayload.data,
      );

      if (result.err) {
        return response(res, "fail", result);
      }

      return response(
        res,
        "success",
        result,
        "Data berhasil diperbarui",
        SUCCESS.OK,
      );
    } catch (err) {
      return response(
        res,
        "fail",
        { err: new InternalServerError(err.message) },
        "Terjadi kesalahan yang tidak terduga",
        ERROR.INTERNAL_ERROR,
      );
    }
  }

  // DELETE - DELETE /your-module-api/delete/:id
  async deleteYourModule(req, res) {
    try {
      const { id } = req.params;

      const result = await yourModuleService.deleteYourModule(id);

      if (result.err) {
        return response(res, "fail", result);
      }

      return response(
        res,
        "success",
        result,
        "Data berhasil dihapus",
        SUCCESS.OK,
      );
    } catch (err) {
      return response(
        res,
        "fail",
        { err: new InternalServerError(err.message) },
        "Terjadi kesalahan yang tidak terduga",
        ERROR.INTERNAL_ERROR,
      );
    }
  }
}

module.exports = new YourModuleController();
Langkah 6: Buat Index (index.js)
File: index.js
const yourModuleController = require("./controllers/yourModule.controller");

module.exports = {
  yourModuleController,
};
Langkah 7: Buat Routes
File: routes/yourModule.routes.js
const express = require("express");
const { yourModuleController } = require("../modules/yourModule");
const { verifyJWT } = require("../middleware/verifyJWT");

const router = express.Router();

// Route publik
router.get("/get", yourModuleController.getAllYourModule);
router.get("/get/:id", yourModuleController.getYourModuleById);

// Route yang dilindungi (butuh JWT)
router.post("/add", verifyJWT, yourModuleController.addYourModule);
router.patch("/update/:id", verifyJWT, yourModuleController.updateYourModule);
router.delete("/delete/:id", verifyJWT, yourModuleController.deleteYourModule);

module.exports = router;
Langkah 8: Daftarkan Routes di index.js
File: src/index.js
const yourModuleRoutes = require("./routes/yourModule.routes");

// ... kode lainnya

app.use("/your-module-api", yourModuleRoutes);
Using Wrapper Functions
Response Wrapper
Fungsi response menstandarisasi semua response API.
Lokasi: helpers/utils/wrapper.js
Penggunaan di Controller:
const { response } = require("../../../helpers/utils/wrapper");
const { SUCCESS, ERROR } = require("../../../helpers/http-status/status_code");

// Response sukses
return response(
  res, // Object response Express
  "success", // Status: 'success' atau 'fail'
  result, // Object data dari service
  "Pesan sukses custom", // Pesan opsional
  SUCCESS.OK, // HTTP status code (200)
);

// Response error
return response(
  res,
  "fail",
  result, // Berisi { err: ErrorObject }
  "Pesan error custom", // Pesan opsional
  ERROR.NOT_FOUND, // HTTP status code (404)
);
Data/Error Wrapper (Layer Service)
Fungsi data dan error membungkus hasil service.
Lokasi: helpers/utils/wrapper.js
Penggunaan di Service:
const { data, error } = require('../../../helpers/utils/wrapper');
const { NotFoundError, BadRequestError } = require('../../../helpers/error');

// Kembalikan data sukses
async getSomething() {
  try {
    const result = await repository.find();
    return data(result);  // Return: { err: null, data: result }
  } catch (err) {
    return error(err);    // Return: { err: err, data: null }
  }
}

// Kembalikan custom error
async checkSomething() {
  try {
    const item = await repository.findById(id);

    if (!item) {
      return error(new NotFoundError('Data Tidak Ditemukan'));
    }

    return data(item);
  } catch (err) {
    return error(err);
  }
}
Class Error yang Tersedia
Lokasi: helpers/error/
const {
  BadRequestError, // 400 - Input tidak valid
  UnauthorizedError, // 401 - Tidak terautentikasi
  ForbiddenError, // 403 - Tidak ada izin
  NotFoundError, // 404 - Resource tidak ditemukan
  ConflictError, // 409 - Data duplikat
  ExpectationFailedError, // 417 - Validasi gagal
  InternalServerError, // 500 - Server error
  ServiceUnavailableError, // 503 - Service mati
  GatewayTimeoutError, // 504 - Timeout
} = require("../../../helpers/error");

// Contoh penggunaan
return error(new BadRequestError("Email Sudah Terdaftar"));
return error(new NotFoundError("Mahasiswa Tidak Ditemukan"));
return error(new ForbiddenError("Akses Ditolak"));
HTTP Status Code
Lokasi: helpers/http-status/status_code.js
const { SUCCESS, ERROR } = require("../../../helpers/http-status/status_code");

// Success codes
SUCCESS.OK; // 200
SUCCESS.CREATED; // 201

// Error codes
ERROR.BAD_REQUEST; // 400
ERROR.UNAUTHORIZED; // 401
ERROR.FORBIDDEN; // 403
ERROR.NOT_FOUND; // 404
ERROR.CONFLICT; // 409
ERROR.EXPECTATION_FAILED; // 417
ERROR.INTERNAL_ERROR; // 500
ERROR.SERVICE_UNAVAILABLE; // 503
ERROR.GATEWAY_TIMEOUT; // 504
Contoh Lengkap: Tambah Record Baru
1. Client mengirim request
POST /your-module-api/add
Headers: { Authorization: "Bearer JWT_TOKEN" }
Body: { "name": "John", "email": "john@example.com", "age": 25 }
2. Route menerima dan memanggil controller
router.post("/add", verifyJWT, yourModuleController.addYourModule);
3. Controller validasi input
const validatePayload = isValidPayload(payload, createYourModuleModel);

if (validatePayload.err) {
  // Return validation error dengan status 417
  return response(res, "fail", validatePayload, "Validasi gagal", 417);
}
4. Controller memanggil service
const result = await yourModuleService.createYourModule(validatePayload.data);
5. Service memproses business logic
// Cek duplikat
const existing = await repository.findByEmail(data.email);
if (existing) {
  return error(new BadRequestError("Email Sudah Terdaftar"));
}

// Buat record
const result = await repository.create(data);
return data(result);
6. Repository query database
return prisma.yourModel.create({ data: data });
7. Response mengalir kembali
Sukses:
// Service return: { err: null, data: createdRecord }
// Controller cek: if (result.err) → false, lanjut
// Controller return response dengan status 201

Response: {
  "message": "Data berhasil ditambahkan",
  "data": { "id": 1, "name": "John", "email": "john@example.com" }
}
Error:
// Service return: { err: BadRequestError, data: null }
// Controller cek: if (result.err) → true
// Controller return error response

Response: {
  "message": "Email Sudah Terdaftar",
  "error": "BadRequestError"
}
Contoh Validasi
Validasi Input dengan Joi
const validatePayload = isValidPayload(payload, createYourModuleModel);

// Sukses
validatePayload = {
  err: null,
  data: { name: "John", email: "john@example.com", age: 25 },
};

// Validasi gagal
validatePayload = {
  err: {
    details: [
      { message: "Email wajib diisi" },
      { message: "Umur minimal 18 tahun" },
    ],
  },
  data: null,
};
Response untuk Validation Error
if (validatePayload.err) {
  return response(
    res,
    'fail',
    validatePayload,
    'Validasi gagal',
    ERROR.EXPECTATION_FAILED  // 417
  );
}

// Client menerima:
{
  "message": "Validasi gagal",
  "errors": [
    "Email wajib diisi",
    "Umur minimal 18 tahun"
  ]
}
Contoh Upload File
Controller dengan Upload File
const multer = require('../../../middleware/multer');
const { deleteFileIfExists } = require('../../../helpers/utils/fileHelper');

// Route dengan multer
router.post('/add', verifyJWT, multer.single('image'), controller.add);

// Controller
async add(req, res) {
  try {
    const payload = req.body;
    const imageFile = req.file;  // Ambil file yang diupload

    // Validasi
    const validatePayload = isValidPayload(payload, createModel);

    if (validatePayload.err) {
      // Hapus file yang diupload jika validasi gagal
      if (imageFile?.filename) {
        await deleteFileIfExists(imageFile.filename);
      }
      return response(res, 'fail', validatePayload, 'Validasi gagal', 417);
    }

    // Panggil service dengan file
    const result = await service.create(validatePayload.data, imageFile);

    if (result.err) {
      // Hapus file yang diupload jika service gagal
      if (imageFile?.filename) {
        await deleteFileIfExists(imageFile.filename);
      }
      return response(res, 'fail', result);
    }

    return response(res, 'success', result, 'Data berhasil ditambahkan', 201);
  } catch (err) {
    // Hapus file yang diupload saat terjadi error tidak terduga
    if (req.file?.filename) {
      await deleteFileIfExists(req.file.filename);
    }
    return response(res, 'fail', { err: new InternalServerError(err.message) });
  }
}
🧪 Testing
1. Test dengan Swagger UI
Buka Swagger documentation di browser:
http://localhost:9000/api-docs
Swagger UI menyediakan:
- Interactive API testing
- Request/response examples
- Schema definitions
- Authentication testing
2. Test dengan curl
Contoh Testing Endpoints:
# Create
curl -X POST http://localhost:9000/your-module-api/add \
  -H "Authorization: Bearer YOUR_JWT_TOKEN" \
  -H "Content-Type: application/json" \
  -d '{"name":"John","email":"john@example.com","age":25}'

# Get all
curl http://localhost:9000/your-module-api/get

# Get by ID
curl http://localhost:9000/your-module-api/get/1

# Update
curl -X PATCH http://localhost:9000/your-module-api/update/1 \
  -H "Authorization: Bearer YOUR_JWT_TOKEN" \
  -H "Content-Type: application/json" \
  -d '{"name":"John Updated"}'

# Delete
curl -X DELETE http://localhost:9000/your-module-api/delete/1 \
  -H "Authorization: Bearer YOUR_JWT_TOKEN"
📝 API Documentation
Database Schema
Database terdiri dari 7 tabel utama:
- mahasiswa: Data lengkap mahasiswa yang mendaftar magang
- admin: Data admin untuk login dan mengelola lowongan
- lowongan_magang: Informasi detail posisi magang yang tersedia
- lamaran_magang: Data lamaran yang diajukan mahasiswa
- hasil_research: Hasil riset proyek dari mahasiswa atau tim
- partnership: Data partner/institusi yang bekerja sama
- faq: Frequently Asked Questions
API Modules
Project Architecture
Technology Stack
- Runtime: Node.js
- Framework: Express.js 4.x
- ORM: Prisma 6.16.2
- Database: MySQL
- Authentication: JWT (RS256 with signature)
- Validation: Joi
- File Upload: Multer
- Email Service: Nodemailer
- Documentation: Swagger/OpenAPI
- Deployment: Vercel (Serverless)
Project Structure
src/
├── index.js                    # Main application entry point
├── config/                     # Configuration files
├── docs/                       # Documentation and ERD
├── helpers/                    # Helper utilities
│   ├── db/                     # Database connection (Prisma)
│   ├── error/                  # Custom error classes
│   ├── http-status/            # HTTP status codes
│   ├── infra/                  # Infrastructure config
│   └── utils/                  # Utility functions (validator, wrapper, file helper)
├── middleware/                 # Express middleware
│   ├── multer.js              # File upload configuration
│   ├── recaptcha.js           # ReCaptcha verification
│   └── verifyJWT.js           # JWT authentication
├── modules/                    # Feature modules (MVC pattern)
│   ├── admin/
│   ├── auth/
│   ├── hasilResearch/
│   ├── lamaranMagang/
│   ├── lowonganMagang/
│   ├── mahasiswa/
│   └── partnership/
├── routes/                     # API route definitions
└── uploads/                    # File upload directory (local)
Module Architecture (MVC Pattern)
Each module follows this structure:
module/
├── index.js                   # Module exports
├── controllers/               # Handle HTTP requests/responses
├── services/                  # Business logic layer
├── repositories/              # Database access layer (Prisma)
├── models/                    # Joi validation schemas
└── helpers/ (optional)        # Module-specific helpers
Data Flow:
Route → Controller → Service → Repository → Database
                                    ↓
Route ← Controller ← Service ← Repository
Key Features
1. JWT Authentication (RS256)
- Uses RSA signature-based tokens
- Token expiry: 1 day
- Signature field for additional security
- Middleware:
verifyJWT
2. Joi Validation
- All API inputs validated with Joi schemas
- Indonesian error messages
- Located in
models/directory of each module
3. File Upload Management
- Development: Files stored in
src/uploads/ - Production: Files stored in
/tmp/uploads/(Vercel) - Automatic file cleanup on validation/service errors
- Supports: Images (JPG, PNG), PDFs
- Max file size: 4.5MB
4. Automatic Status Updates
lowonganMagangstatus automatically updates based on dates:akan-datang: Before start dateaktif: Between start and end dateselesai: After end date
5. CORS Configuration
- Open to all origins (configurable)
- Supports credentials
- Pre-flight request handling
6. Error Handling
- Centralized error classes
- Indonesian error messages
- Consistent error response format
API Modules
1. Admin Module
Manage admin accounts and authentication.
Endpoints:
POST /admin-api/add- Create admin (requires JWT)GET /admin-api/get- Get all admins (requires JWT)
2. Auth Module
Authentication and authorization.
Endpoints:
POST /auth-api/login- Admin loginGET /auth-api/me- Get authenticated admin details (requires JWT)
3. Lowongan Magang Module
Manage internship vacancies.
Endpoints:
POST /lowongan-magang-api/add- Create vacancy (requires JWT)GET /lowongan-magang-api/get- Get all vacanciesGET /lowongan-magang-api/get/id/:id- Get vacancy by IDGET /lowongan-magang-api/get/kelompok/:kelompok_peminatan- Get by specializationGET /lowongan-magang-api/get/kelompok-all- Get all specializationsPATCH /lowongan-magang-api/update/:id- Update vacancy (requires JWT)DELETE /lowongan-magang-api/delete/:id- Delete vacancy (requires JWT)
Features:
- Automatic status calculation
- Image upload support
- Filter by specialization group
4. Lamaran Magang Module
Manage internship applications.
Endpoints:
POST /lamaran-magang-api/add/:id_lowongan_magang- Submit application (with ReCaptcha)POST /lamaran-magang-api/add-mobile/:id_lowongan_magang- Submit from mobile (no ReCaptcha)GET /lamaran-magang-api/get- Get all applications (requires JWT)GET /lamaran-magang-api/get/:id_lamaran_magang- Get application by ID (requires JWT)PATCH /lamaran-magang-api/update/:id_lamaran_magang- Update status (requires JWT)GET /lamaran-magang-api/export- Export to Excel (requires JWT)DELETE /lamaran-magang-api/delete/:id- Delete application (requires JWT)
Features:
- CV and portfolio upload (multiple files)
- Email confirmation on submission
- Excel export functionality
- Automatic file cleanup on errors
5. Mahasiswa Module
Manage student data.
Endpoints:
GET /mahasiswa-api/get- Get all students (requires JWT)
Note: Students are automatically created when submitting applications.
6. Partnership Module
Manage partner organizations.
Endpoints:
POST /partnership-api/add- Add partner (requires JWT)GET /partnership-api/get- Get all partnersGET /partnership-api/get/:id- Get partner by IDPATCH /partnership-api/update/:id- Update partner (requires JWT)DELETE /partnership-api/delete/:id- Delete partner (requires JWT)
Features:
- Logo image upload
- Automatic file cleanup on errors
7. Hasil Research Module
Manage research results/publications.
Endpoints:
POST /hasil-research-api/add- Add research (requires JWT)GET /hasil-research-api/get- Get all researchGET /hasil-research-api/get/:id- Get research by IDPATCH /hasil-research-api/update/:id- Update research (requires JWT)DELETE /hasil-research-api/delete/:id- Delete research (requires JWT)
Features:
- Image upload support
- Automatic file cleanup on errors
8. FAQ Module
Manage Frequently Asked Questions.
Endpoints:
POST /faq-api/add- Add FAQ (requires JWT - Admin only)GET /faq-api/get- Get all FAQs (Public)GET /faq-api/get/:id- Get FAQ by ID (Public)PATCH /faq-api/update/:id- Update FAQ (requires JWT - Admin only)DELETE /faq-api/delete/:id- Delete FAQ (requires JWT - Admin only)
Environment Variables Reference
Berikut penjelasan lengkap setiap environment variable:
| Variable | Type | Required | Description | Example |
|---|---|---|---|---|
DATABASE_URL |
string | Yes | MySQL connection string | mysql://user:pass@host:3306/db |
PORT |
number | Yes | Port server akan berjalan | 9000 |
AUTH_EMAIL |
string | Yes | Email untuk mengirim notifikasi | admin@example.com |
AUTH_PASSWORD |
string | Yes | App-specific password Gmail | xxxx xxxx xxxx xxxx |
JWT_PRIVATE_KEY |
string | Yes | RSA private key untuk signing JWT | See .env.example |
JWT_PUBLIC_KEY |
string | Yes | RSA public key untuk verify JWT | See .env.example |
RECAPTCHA_SECRET_KEY |
string | Yes | Google ReCaptcha secret key | 6Lxxxxxxx... |
RECAPTCHA_SITE_KEY |
string | Yes | Google ReCaptcha site key | 6Lxxxxxxx... |
📝 Note:
- Untuk
AUTH_PASSWORD, gunakan App Password dari Google- Untuk generate JWT keys, gunakan OpenSSL (lihat Quick Start section)
- Untuk ReCaptcha keys, daftar di Google ReCaptcha
Database Migration Commands
Berikut command untuk mengelola database migrations:
Initial Setup
npx prisma generate
npx prisma migrate dev --name init
Reset Database
npx prisma migrate reset
Deploy to Production
npx prisma migrate deploy
🚀 Deployment
Deployment ke Vercel
1. Vercel Configuration
Create vercel.json:
{
  "version": 2,
  "builds": [
    {
      "src": "src/index.js",
      "use": "@vercel/node"
    }
  ],
  "routes": [
    {
      "src": "/(.*)",
      "dest": "src/index.js"
    }
  ]
}
2. Environment Variables
Set all .env variables in Vercel dashboard.
3. Database Connection
Ensure DATABASE_URL points to your production MySQL instance.
4. Build Command
npm run vercel-build
5. Important Notes
- Files uploaded to
/tmp/uploads/(temporary) - Serverless functions have 10-second timeout
- Cold start may affect first request
CI/CD Pipeline (GitHub Actions)
Automatic migration on push to main branch.
Workflow:
- Push to main branch
- GitHub Actions triggers
- Runs
prisma migrate deploy - Database updated automatically
👥 Contributing
Development Workflow
1. Adding a New Feature
# 1. Create feature branch
git checkout -b feature/new-feature

# 2. Create module structure
modules/
  newModule/
    ├── index.js
    ├── controllers/
    ├── services/
    ├── repositories/
    ├── models/

# 3. Update Prisma schema (if needed)
# Edit prisma/schema.prisma

# 4. Run migration
npx prisma migrate dev --name add_new_feature

# 5. Create route file
routes/newModule.routes.js

# 6. Register route in src/index.js
app.use("/new-module-api", newModuleRoutes);

# 7. Test locally
npm run dev

# 8. Commit and push
git add .
git commit -m "feat: add new feature"
git push origin feature/new-feature
2. Testing API Endpoints
Use Swagger UI: http://localhost:9000/api-docs
Or use tools like:
- Postman
- Thunder Client
- curl
3. File Upload Testing
# Test with curl
curl -X POST http://localhost:9000/lowongan-magang-api/add \
  -H "Authorization: Bearer YOUR_JWT_TOKEN" \
  -F "image=@/path/to/image.jpg" \
  -F "posisi=Backend Developer" \
  -F "kelompok_peminatan=Software Engineering" \
  -F "paid=paid"
🔧 Troubleshooting
Common Issues & Solutions
1. CORS Error
Problem: Frontend can't access API
Solution: Check CORS configuration in src/index.js
2. File Upload Fails
Problem: "File tidak ditemukan"
Solution: Check fileHelper.js upload directory configuration
3. JWT Token Invalid
Problem: "Invalid or expired token"
Solution:
- Check token expiry (1 day)
- Verify JWT_PUBLIC_KEY in .env
- Ensure signature field matches
4. Prisma Client Error
Problem: "PrismaClient is unable to run in this browser environment"
Solution:
npx prisma generate
5. Express 5.x Route Error
Problem: "Missing parameter name"
Solution: Downgrade to Express 4.x (already fixed in package.json)
API Response Format
Success Response
{
  "message": "Success message",
  "data": { ... }
}
Error Response
{
  "message": "Error message",
  "error": "Detailed error description"
}
Validation Error
{
  "message": "Validation failed",
  "errors": ["Field 'email' wajib diisi", "Field 'password' minimal 8 karakter"]
}
Security Best Practices
- Never commit
.envfile - Use strong JWT secrets
- Validate all inputs with Joi
- Sanitize file uploads
- Limit file upload size (4.5MB)
- Use HTTPS in production
- Enable ReCaptcha for public endpoints
- Implement rate limiting (recommended)
Performance Optimization
- File Cleanup: Automatically removes orphaned files
- Index Optimization: Database indexes on frequently queried fields
- Connection Pooling: Prisma handles connection pooling
- Status Caching: Status calculations cached in helpers
Contributing Guidelines
Code Style
- Use CommonJS (
require/module.exports) - Follow existing module structure
- Use Indonesian for error messages
- Add JSDoc comments for functions
- Use meaningful variable names
Commit Messages
Follow conventional commits:
feat: add new feature
fix: fix bug
docs: update documentation
refactor: refactor code
test: add tests
chore: update dependencies
Pull Request Process
- Create feature branch
- Make changes
- Test locally
- Update documentation
- Create pull request
- Wait for review
- Merge after approval
Changelog
Version 2.0.0 (Current)
- ✅ Prisma ORM migration
- ✅ JWT RS256 authentication
- ✅ Joi validation with Indonesian messages
- ✅ File upload with automatic cleanup
- ✅ Vercel deployment configuration
- ✅ Swagger documentation
- ✅ CI/CD with GitHub Actions
- ✅ CORS configuration
- ✅ Express 4.x compatibility
📚 Quick Reference
Useful Commands
# Development
npm run dev                      # Start development server
npm start                        # Start production server

# Database
npx prisma generate              # Generate Prisma client
npx prisma migrate dev           # Create and apply migration
npx prisma migrate deploy        # Deploy migrations to production
npx prisma migrate reset         # Reset database
npx prisma studio                # Open Prisma Studio GUI

# Testing
curl http://localhost:9000/api-docs  # Open API documentation

# Git
git checkout -b feature/name     # Create new feature branch
git add .                        # Stage changes
git commit -m "message"          # Commit changes
git push origin branch-name      # Push to remote
Important URLs
| Service | URL | Purpose |
|---|---|---|
| Local API | http://localhost:9000 |
Development server |
| Swagger Docs | http://localhost:9000/api-docs |
API documentation |
| Prisma Studio | http://localhost:5555 |
Database GUI |
| Production | Your Vercel URL | Production endpoint |
Project Links
- 🌐 Repository: GitHub - Ditrogen/backend-intern-humic
- 📖 Prisma Docs: https://www.prisma.io/docs
- 📘 Express Docs: https://expressjs.com
- 🔐 JWT Info: https://jwt.io
📄 License
This API is licensed under the MIT License.
💬 Support
Jika ada pertanyaan atau masalah:
- Buka issue di GitHub Issues
- Hubungi team development
- Baca dokumentasi di README ini
Made with ❤️ by HUMIC Engineering Intern Team